Bu projenin amacı nedir?
Bu bölümde, ARM mikrodenetleyicisi STM32F serisini kullanarak BMP390 sensörünü başlatacağız. Bu projede daha rahat ve optimum şekilde kullanmak için iki hazır modül GB636EN ve Gebra STM32F303 kullanıyoruz. Bu iki modül, Gebra ekibi tarafından çalışmayı kolaylaştırmak için sağlanan BMP390 sensörünün ve STM32F mikrodenetleyicisinin minimum gerekli elemanlarını içerir.
Bu eğitimde neler öğreneceğiz?
Bu eğitimde, BMP390 sensörünü kurmanın ve kullanmanın yanı sıra, tüm BMP390 sensör kayıtlarını, SPI protokolünü kullanarak bu sensörü kurmak için STM32 mikrodenetleyicisinin çeşitli parçalarını nasıl ayarlayacağınızı, GB636EN modülüne özgü kütüphane ve sürücü dosyasını nasıl kullanacağınızı öğreneceksiniz. Ayrıca, fonksiyonları nasıl bildireceğinizi ve son olarak Keil derleyicisinde sensör verilerini nasıl alacağınızı da öğreneceksiniz.
Bu projeye başlamak için neye ihtiyacımız var?
bu projeyi gerçekleştirmek için bazı donanım ve yazılımlara ihtiyacımız var. Bu donanım ve yazılımların başlıkları aşağıdaki tabloda sizlere sunulmuştur ve her birinin üzerine tıklayarak hazırlayabilir/indirebilir ve başlamaya hazırlanabilirsiniz.
| GEREKLİ DONANIM | GEREKLİ YAZILIM |
|---|---|
| ST-LINK/V2 Programmer | Keil uVision Programmer – (Nasıl kurulur ?) |
| STM32 Microcontroller – ( Gebra STM32f303 ) | STM32CubeMX Program – (Nasıl kurulur ?) |
| Gebra BMP390 Dijital Basınç Modülü |
Öncelikle kart üzerindeki jumperları kullanarak SPI haberleşme protokolünü seçiyoruz ve ardından Gebra BMP390 modülünü aşağıdaki resimde gösterildiği gibi Gebra STM32F303 modülü üzerine Pin to Pin olarak yerleştiriyoruz:

Not: Yukarıdaki resim yalnızca Gebra BMP390 modülünün Gebra STM32F303 modülünde pin to pin olarak nasıl yerleştirildiğini göstermek içindir. Bu nedenle, SPI iletişim protokolünü kullanmak için kullanıcı, yerleşik seçici jumper’ların doğru durumunu seçmelidir.
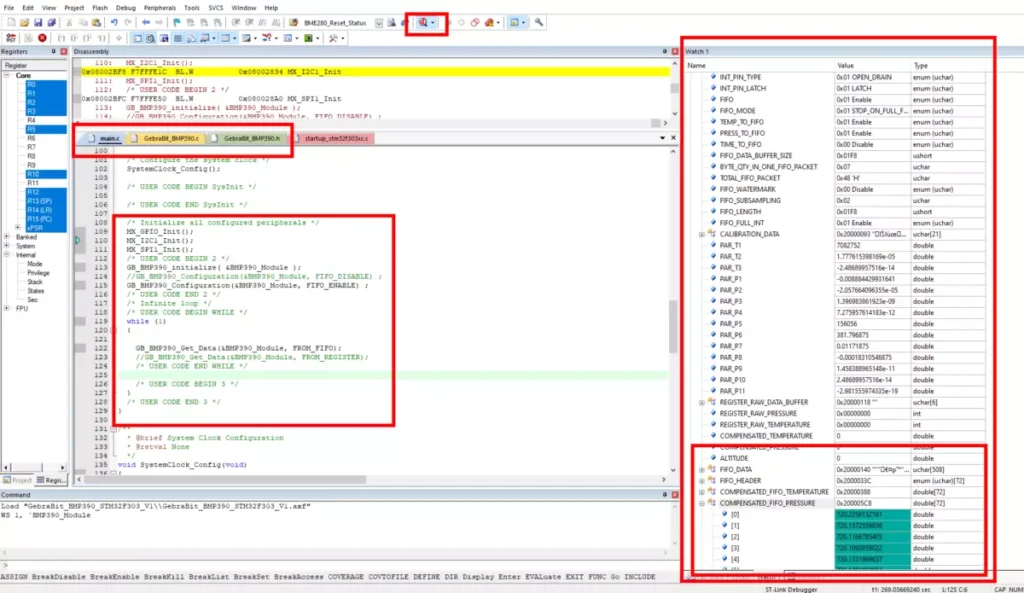
Son olarak Keil derleyicisinin “Debug Session” modunda “Watch1” penceresinde sıcaklık, basınç ve yaklaşık yükseklik değerlerini gerçek zamanlı olarak göreceğiz.
STM32CubeMX ayarları
Aşağıda, Gebra BMP390 modülünü geliştirmek için STM32F303 mikrodenetleyicisindeki “SPI”, “RCC”, “Debug” ve “Clock” bölümlerinin her biriyle ilgili ayarları inceliyoruz.
RCC / Clock ayarları
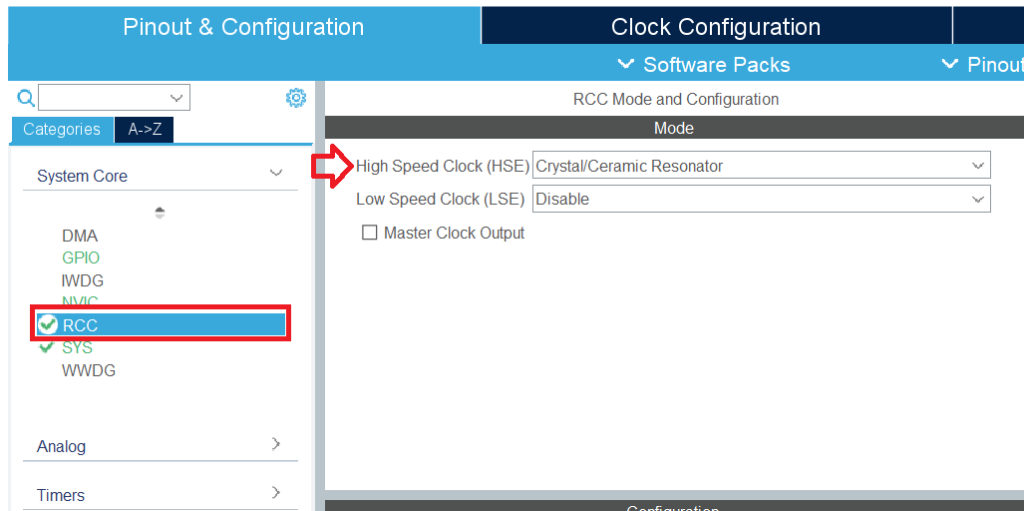
Gebra STM32F303‘de harici kristalin (External Crystal) bulunması nedeniyle “RCC” kısmında “Crystal/Ceramic Resonator”i seçiyoruz:
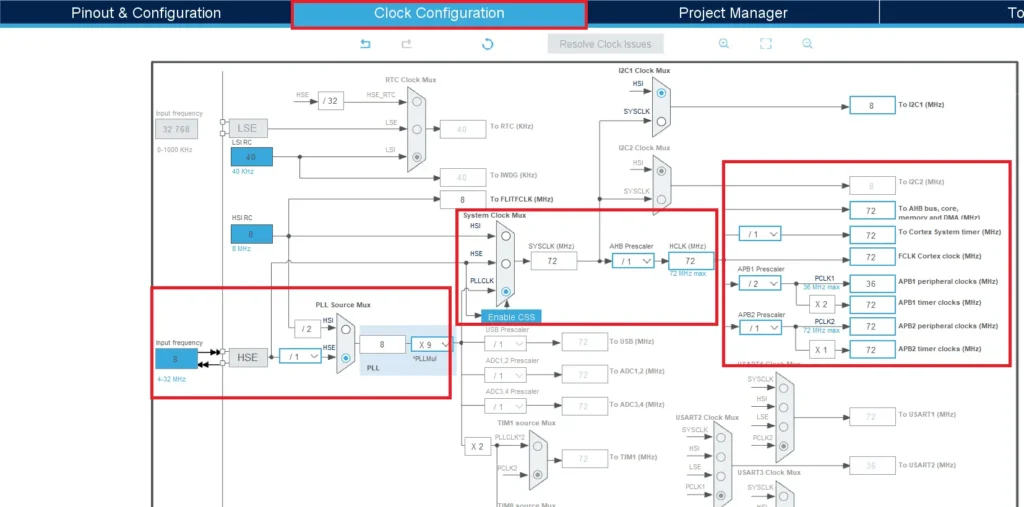
Daha sonra Clock Configuration sayfasından PLLCLK modunu seçiyoruz ve diğer gereklı ayarları yapıyoruz (daha fazla bilgi için tıklayınız)
Debug & Programming ayarları
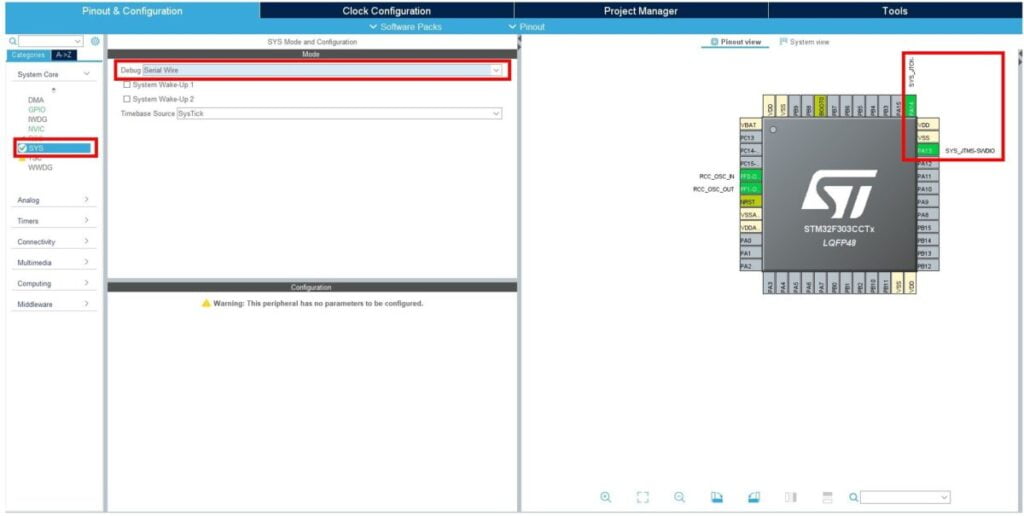
bu modülde Debug&Programming sırasında pin sayısını azaltmak için “SWCLK” ve “SWDIO” pinleri için “SYS” bloğunda “Debug” kısmından “Serial Wire” seçeneğini seçiyoruz.
Project Manager ayarları
“Project Manager” ayarları aşağıdaki gibidir, burada “MDK-ARM” versiyon “5.32” kullandık. eğer siz kodlamak için başka bir İDE kullanıyorsanız Toolchain seçeneğinden kullandığınız İDE’yi seçmeniz gerekecek

Yukarıdaki tüm ayarları tamamladıktan sonra GENERATE CODE seçeneğine tıklıyoruz.
Source Code
Projenin kütüphanesi (Library)
GebraMS, çeşitli sensör ve entegrelerin modüler tasarımına ek olarak, kullanıcıların yazılım kurma ve geliştirme işlemlerini kolaylaştırmak için C dilinde çeşitli yapılandırılmış ve donanımdan bağımsız kütüphaneler (Library) sağlamaya çalışır. Bu amaçla, kullanıcılar, istedikleri modülün kütüphanesini “.h” ve “.c” dosyasını (Başlık ve Kaynak) olarak indirebilirler.
GebraMS tarafından sağlanan projenin kütüphanesini projenize ekleyerek ( projeye dosya nasıl eklenir ) kodumuzu kolayca geliştirebiliriz. ilgili dosyaları projenin sonunda veya sağ tarafta ilgili sayfalar kısmında bulabilirsiniz
Kütüphanede tanımlanan tüm fonksiyonlar tüm detaylarıyla yorumlanmakta ve fonksiyonların argümanlarında alınan tüm parametreler ve dönüş değerleri kısaca açıklanmaktadır. Kütüphaneler donanımdan bağımsız olduğundan kullanıcı istediği compiler’e kolaylıkla kütüphaneyi ekleyebilir ve istediği mikroişlemci ve geliştirme kartı ile geliştirebilir.
Gebra BMP390.h başlık dosyası
Bu dosyada, sensör veya IC’nin veri sayfasına dayanarak, tüm adres kayıtları, her kaydın değerleri “Numaralandırma” biçiminde tanımlanır. Ayrıca, BMP390 sensörünün kasası ve BMP390 sensörünün her bir dahili bloğuyla ilgili yapılandırmalar, Gebra_BMP390 adlı bir “STRUCT” biçiminde tanımlanır. Son olarak, Hata Ayıklama Oturumu ortamında, her blokla ilgili tüm yapılandırmalar gerçek zamanlı olarak görülebilir.
Error_Condition Enum
Sensor errors are defined in this enum
 typedef enum Error_Condition
 {
  FATAL_ERR = 1 ,
  CMD_ERR   = 2 ,
  CONF_ERR  = 4
 }BMP390_Error_Condition;
Sensor_Status Enum
The sensor performance status is defined in this enum:
 typedef enum Sensor_Status
 {
  CMD_RDY    = 0x10 ,
  DRDY_PRESS = 0x20 ,
  DRDY_TEMP  = 0x40
 }BMP390_Sensor_Status;
Interrupt_Status Enum
The occurred interrupt type is defined in this enum:
 typedef enum Interrupt_Status
 {
  FIFO_WATERMARK_INTERRUPT = 0x01 ,
  FIFO_FULL_INTERRUPT      = 0x02 ,
  DATA_READY_INTERRUPT     = 0x08
 }BMP390_Interrupt_Status
Data_Select Enum
Using this Enum, it is determined whether the output data is filtered or not:
 typedef enum Data_Select
 {
   UNFILTERED_DATA = 0 ,
   FILTERED_DATA
 }BMP390_Data_Select;
FIFO_Mode Enum
Using this Enum, the type of data in FIFO is specified:
 typedef enum FIFO_Mode
 {
 	STREAM_TO_FIFO = 0 ,
 	STOP_ON_FULL_FIFO_SNAPSHOT = 1
 }BMP390_FIFO_Mode
BMP390_Ability Enum
The ability to activate or deactivate different parts of the sensor is defined in this enum:
 typedef enum Ability
 {
 Disable = 0 ,
 Enable
 }BMP390_Ability;
BMP390_Power_Mode Enum
The values of this enum are used to select the sensor Power mode:
 typedef enum Power_Mode
 {
 SLEEP_MODE  = 0,
 FORCED_MODE = 1,
 NORMAL_MODE = 3
 } BMP390_Power_Mode;
BMP390_Sensor_Oversampling Enum
The values of this enum are used to select oversampling of the sensor:
 typedef enum Pressure_Oversampling
 {
 	 X1_NO_OVERSAMPLING = 0 ,
 	 X2_OVERSAMPLING    = 1 ,
 	 X4_OVERSAMPLING    = 2 ,
 	 X8_OVERSAMPLING    = 3 ,
 	 X16_OVERSAMPLING   = 4 ,
 	 X32_OVERSAMPLING   = 5
 } BMP390_Sensor_Oversampling;
BMP390_Output_Data_Rate Enum
The values of this enum are used to select the sensor output data rate:
 typedef enum Output_Data_Rate
  {
  	 ODR_200_HZ_5_mS         = 0 ,
  	 ODR_100_HZ_10_mS        = 1 ,
  	 ODR_50_HZ_20_mS         = 2 ,
  	 ODR_25_HZ_40_mS         = 3 ,
  	 ODR_12P5_HZ_80_mS       = 4 ,
  	 ODR_6P25_HZ_160_mS      = 5 ,
  	 ODR_3P1_HZ_320_mS       = 6 ,
 	 ODR_1P5_HZ_640_mS       = 7 ,
 	 ODR_0P78_HZ_1280_mS     = 8 ,
 	 ODR_0P39_HZ_2560_mS     = 9 ,
 	 ODR_0P2_HZ_5120_mS      = 10 ,
 	 ODR_0P1_HZ_10240_mS     = 11 ,
 	 ODR_0P05_HZ_20480_mS    = 12 ,
 	 ODR_0P02_HZ_40960_mS    = 13 ,
 	 ODR_0P01_HZ_81920_mS    = 14 ,
 	 ODR_0P006_HZ_163840_mS  = 15 ,
 	 ODR_0P003_HZ_327680_mS  = 16 ,
 	 ODR_0P0015_HZ_655360_mS = 17
 } BMP390_Output_Data_Rate;
BMP390_IIR_Filter_Coefficient Enum
The values of this enum are used to select the appropriate sensor calibration coefficients values:
 typedef enum IIR_Filter_Coefficient
  {
  	 FILTER_BYPASS_MODE     = 0 ,
  	 FILTER_COEFFICIENT_1   = 1 ,
  	 FILTER_COEFFICIENT_3   = 2 ,
  	 FILTER_COEFFICIENT_7   = 3 ,
  	 FILTER_COEFFICIENT_15  = 4 ,
  	 FILTER_COEFFICIENT_31  = 5 ,
  	 FILTER_COEFFICIENT_63  = 6 ,
 	 FILTER_COEFFICIENT_127 = 7
 } BMP390_IIR_Filter_Coefficient;
BMP390_ FIFO_Header Enum
The values of this enum are used to select the data frame type in the FIFO header:
 typedef enum FIFO_Header
  {
  	 FIFO_EMPTY_FRAME     	 = 0x80 ,
  	 FIFO_CONFIG_CHANGE   	 = 0x48 ,
  	 FIFO_ERROR_FRAME        = 0x44 ,
  	 FIFO_TIME_FRAME   		 = 0xA0 ,
  	 FIFO_PRESS_FRAME  		 = 0x84 ,
  	 FIFO_TEMP_FRAME  		 = 0x90 ,
  	 FIFO_TEMP_PRESS_FRAME   = 0x94
 } BMP390_FIFO_Header;
BMP390_Preparation Enum
The values of this enum determine whether the data is ready or not:
 typedef enum Preparation
 {
 	IS_Ready = 0 ,
 	IS_NOT_Ready
 }BMP390_Preparation;
BMP390_ Get_DATA Enum
The values of this enum are used to determine how to receive sensor data:
 typedef enum Get_DATA
 {
 	FROM_REGISTER = 0 ,
 	FROM_FIFO
 } BMP390_Get_DATA;
BMP390_Reset_Status Enum
The values of this enum determine whether the sensor is reset or not:
 typedef enum
 {
 	DONE     = 0 ,
 	FAILED   = 1
 }BMP390_Reset_Status;
BMP390_ INT_Level Enum
The values of this enum are used to determine the basic logic level of Interrupt:
typedef enum int_level
{
ACTIVE_LOW = 0 ,
ACTIVE_ HIGH
} BMP390_INT_Level;
BMP390_ Latch_Type Enum
The values of this enum are used to determine the Interrupt output latch type:
typedef enum latch_type
{
NOT_LATCH = 0 ,
LATCH
} BMP390_Latch_Type;
BMP390_ INT_Type Enum
The values of this enum are used to determine the Interrupt output type:
typedef enum int_type
{
PUSH_PULL = 0 ,
OPEN_DRAIN
}BMP390_INT_Type;
BMP390 struct
All sensor properties, calibration coefficients and sensor data are defined in this “struct” and All the information and configuration implemented on the sensor are stored in this “structure” and you can see the changes in each part of the sensor in the “Debug Session” environment.
Declaration of functions
At the end of this file, all the functions for reading and writing in BMP390 registers, sensor configuration and receiving data from the sensor are declared:
 /********************************************************
   *Declare Read&Write BMP390 Register Values Functions *
   ********************************************************/
  extern	uint8_t	GB_BMP390_Read_Reg_Data ( uint8_t regAddr,uint8_t* data);
  extern	uint8_t GB_BMP390_Read_Reg_Bits (uint8_t regAddr,uint8_t start_bit, uint8_t len, uint8_t* data);
  extern	uint8_t GB_BMP390_Burst_Read(uint8_t regAddr,uint8_t *data, uint16_t byteQuantity);
  extern	uint8_t GB_BMP390_Write_Reg_Data(uint8_t regAddr, uint8_t data);
  extern	uint8_t	GB_BMP390_Write_Reg_Bits(uint8_t regAddr, uint8_t start_bit, uint8_t len, uint8_t data);
  extern	uint8_t GB_BMP390_Burst_Write		( uint8_t regAddr,uint8_t *data, 	uint16_t byteQuantity);
 /********************************************************
  *       Declare BMP390 Configuration Functions       *
  ********************************************************/
 extern void GB_BMP390_Soft_Reset ( GebraBit_BMP390 * BMP390 );
 extern void	GB_BMP390_Get_Device_ID(GebraBit_BMP390 * BMP390);
 extern void	GB_BMP390_Get_Revision_ID(GebraBit_BMP390 * BMP390);
 extern void GB_BMP390_Temperature(GebraBit_BMP390* BMP390 ,BMP390_Ability temp);
 extern void GB_BMP390_Pressure(GebraBit_BMP390 * BMP390 , BMP390_Ability press);
 extern void GB_BMP390_Output_Sample_Rate (GebraBit_BMP390 * BMP390 , BMP390_Output_Data_Rate rate);
 extern void GB_BMP390_IIR_Filter_Coefficient (GebraBit_BMP390 * BMP390 , BMP390_IIR_Filter_Coefficient filter) ;
 extern void GB_BMP390_Check_Sensor_Status(GebraBit_BMP390 * BMP390 );
 extern void GB_BMP390_Check_Error_Codition(GebraBit_BMP390 * BMP390 );
 extern void GB_BMP390_Check_FIFO_Full_Interrupt_(GebraBit_BMP390 * BMP390 );
 extern void GB_BMP390_Check_Data_Ready_Interrupt(GebraBit_BMP390 * BMP390 );
 extern void GB_BMP390_Temperature_OverSampling(GebraBit_BMP390* BMP390 ,BMP390_Sensor_Oversampling temp_over) ;
 extern void GB_BMP390_Pressure_OverSampling(GebraBit_BMP390* BMP390 ,BMP390_Sensor_Oversampling press_over);
 extern void GB_BMP390_Power_Mode(GebraBit_BMP390* BMP390 ,BMP390_Power_Mode pmode);
 extern void GB_BMP390_Set_INT_Pin(GebraBit_BMP390 * BMP390 , BMP390_INT_Level level ,BMP390_INT_Type type , BMP390_Latch_Type latch ) ;
 extern void GB_BMP390_Data_Output_Select(GebraBit_BMP390 * BMP390 , BMP390_Data_Select data_sel) ;
 extern void GB_BMP390_Data_Ready_Interrupt(GebraBit_BMP390 * BMP390 , BMP390_Ability data_ready_int);
 extern void GB_BMP390_FIFO(GebraBit_BMP390 * BMP390  , BMP390_Ability fifo) ;
 extern void GB_BMP390_FIFO_Full_Interrupt(GebraBit_BMP390 * BMP390 , BMP390_Ability fifo_full_int) ;
 extern void GB_BMP390_Write_SensorTime_FIFO(GebraBit_BMP390 * BMP390 , BMP390_Ability time_fifo );
 extern void GB_BMP390_Write_Pressure_FIFO(GebraBit_BMP390 * BMP390 , BMP390_Ability press_fifo );
 extern void GB_BMP390_Write_Temperature_FIFO(GebraBit_BMP390 * BMP390 , BMP390_Ability temp_fifo );
 extern void GB_BMP390_FIFO_Mode(GebraBit_BMP390 * BMP390 , BMP390_FIFO_Mode fifo_mode );
 extern void GB_BMP390_FIFO_DownSampling(GebraBit_BMP390 * BMP390,uint8_t dwnsmple);
 extern void GB_BMP390_FIFO_WATERMARK (GebraBit_BMP390 * BMP390,BMP390_Ability watermark , uint16_t wm);
 extern void GB_BMP390_GET_FIFO_Length (GebraBit_BMP390 * BMP390 ) ;
 extern void GB_BMP390_FIFO_Flush(GebraBit_BMP390 * BMP390 );
 extern void GB_BMP390_Read_FIFO(GebraBit_BMP390 * BMP390 , uint16_t qty);
 extern void GB_BMP390_FIFO_Configuration ( GebraBit_BMP390 * BMP390 , BMP390_FIFO_Ability fifo  );
 /********************************************************
  *          Declare BMP390 DATA Functions               *
  ********************************************************/
 extern void GB_BMP390_Get_Register_Raw_Pressure_Temperature(GebraBit_BMP390 * BMP390 )  ;
 extern void GB_BMP390_Calculate_Compensated_Temperature(GebraBit_BMP390 * BMP390 , int32_t raw_temp , double * valid_temp )	;
 extern void GB_BMP390_Calculate_Compensated_Pressure(GebraBit_BMP390 * BMP390 , int32_t raw_press , double valid_temp ,double * valid_press );
 extern void GB_BMP390_FIFO_Data_Partition_Pressure_Temperature(GebraBit_BMP390 * BMP390);
 extern void GB_BMP390_Altitude(GebraBit_BMP390 * BMP390);
 extern void GB_BMP390_Get_Data(GebraBit_BMP390 * BMP390 , BMP390_Get_DATA get_data);
 /********************************************************
  *          Declare BMP390 HIGH LEVEL Functions       *
  ********************************************************/
 extern void GB_BMP390_Set_Power_Management(GebraBit_BMP390 * BMP390 , BMP390_Power_Mode pmode) ;
 extern void GB_BMP390_initialize( GebraBit_BMP390 * BMP390 );
 extern void GB_BMP390_Configuration(GebraBit_BMP390 * BMP390, BMP390_FIFO_Ability fifo);
Gebra_ BMP390.c kaynak dosyası
C dilinde yazılmış olan bu dosyada, tüm fonksiyonlar en ince ayrıntısına kadar yorum satırına alınmış ve fonksiyonların argümanlarında alınan tüm parametreler ve bunların döndürdüğü değerler açıkça açıklanmıştır, bu nedenle sadece açıklamalarla yetiniyoruz ve kullanıcıları daha fazla bilgi için doğrudan bu dosyaya bakmaya davet ediyoruz.
Keil’deki örnek program
STM32CubeMX ile Keil projesini yapıp Gebra tarafından sağlanan “Gebra_BMP390.c” kütüphanesini ekledikten sonra örnek eğitimin “main .c” dosyasını inceleyip Keil derleyicisinin “Debugging” ortamında “watch” kısmında Gebra_BMP390 modülünün çıktısını göreceğiz.
“main.c” dosyasının açıklaması
“main.c” dosyasının başlangıç kısmına dikkatlice bakarsanız, Gebra BMP390 modülünün gerektirdiği yapılara, Enum’lara ve işlevlere erişmek için “Gebra_BMP390.h” başlığının eklendiğini fark edeceksiniz. Bir sonraki kısımda, Gebra_BMP390 yapı tipinin BMP390_Module adlı bir değişkeni (bu yapı Gebra_BMP390 başlığındadır ve Gebra_BMP390 kütüphane açıklama bölümünde açıklanmıştır) Gebra BMP390 modülünün yapılandırması için tanımlanmıştır:
/* Private typedef -----------------------------------------------------------*/
/* USER CODE BEGIN PTD */
GebraBit_BMP390 BMP390_ MODULE;
/* USER CODE END PTD */
In the next section of the written code, we set and configure the GebraBit BMP390 module using the GB_BMP390_initialize (&BMP390_Module) and GB_BME280_Configuration (&BMP390_MODULE) functions:
   /* Initialize all configured peripherals */
   MX_GPIO_Init();
   MX_I2C1_Init();
   MX_SPI1_Init();
   /* USER CODE BEGIN 2 */
   GB_BMP390_initialize( &BMP390_Module );
   //GB_BMP390_Configuration(&BMP390_Module, FIFO_DISABLE) ;
   GB_BMP390_Configuration(&BMP390_Module, FIFO_ENABLE) ;
   /* USER CODE END 2 */
And finally, we read the data from the sensor and continuously receive the values of pressure, temperature and altitude in the “while” part of the program:
 /* USER CODE BEGIN WHILE */
    while (1)
    {

  	GB_BMP390_Get_Data(&BMP390_Module, FROM_FIFO);
  	//GB_BMP390_Get_Data(&BMP390_Module, FROM_REGISTER);
      /* USER CODE END WHILE */

      /* USER CODE BEGIN 3 */
   }
   /* USER CODE END 3 */
The “main.c” file code text:
 /* USER CODE BEGIN Header */
   /*
    * ________________________________________________________________________________________________________
    * Copyright (c) 2020 GebraBit Inc. All rights reserved.
    *
    * This software, related documentation and any modifications thereto (collectively “Software”) is subject
    * to GebraBit and its licensors' intellectual property rights under U.S. and international copyright
    * and other intellectual property rights laws.
    *
   * GebraBit and its licensors retain all intellectual property and proprietary rights in and to the Software
   * and any use, reproduction, disclosure or distribution of the Software without an express license agreement
   * from GebraBit is strictly prohibited.

   * THE SOFTWARE IS PROVIDED "AS IS", WITHOUT WARRANTY OF ANY KIND, EXPRESS OR IMPLIED, INCLUDING BUT
   * NOT LIMITED TO THE WARRANTIES OF MERCHANTABILITY, FITNESS FOR A PARTICULAR PURPOSE AND NON-INFRINGEMENT IN
   * NO EVENT SHALL GebraBit BE LIABLE FOR ANY DIRECT, SPECIAL, INDIRECT, INCIDENTAL, OR CONSEQUENTIAL DAMAGES,
   * OR ANY DAMAGES WHATSOEVER RESULTING FROM LOSS OF USE, DATA OR PROFITS, WHETHER IN AN ACTION OF CONTRACT,
   * NEGLIGENCE OR OTHER TORTIOUS ACTION, ARISING OUT OF OR IN CONNECTION WITH THE USE OR PERFORMANCE
   * OF THE SOFTWARE.
   * ________________________________________________________________________________________________________
   */
  /**
    ******************************************************************************
    * @file           : main.c
    * @brief          : Main program body
  	* @Author       	: Mehrdad Zeinali
    ******************************************************************************
    * @attention
    *
    * Copyright (c) 2022 STMicroelectronics.
    * All rights reserved.
    *
    * This software is licensed under terms that can be found in the LICENSE file
    * in the root directory of this software component.
    * If no LICENSE file comes with this software, it is provided AS-IS.
    *
    ******************************************************************************
    */
  /* USER CODE END Header */
  /* Includes ------------------------------------------------------------------*/
  #include "main.h"
  #include "i2c.h"
  #include "spi.h"
  #include "gpio.h"

  /* Private includes ----------------------------------------------------------*/
  /* USER CODE BEGIN Includes */
  #include "GebraBit_BMPh"
  /* USER CODE END Includes */

  /* Private typedef -----------------------------------------------------------*/
  /* USER CODE BEGIN PTD */
  GebraBit_BMP390 BMP390_Module;
  /* USER CODE END PTD */

  /* Private define ------------------------------------------------------------*/
  /* USER CODE BEGIN PD */
  /* USER CODE END PD */

  /* Private macro -------------------------------------------------------------*/
  /* USER CODE BEGIN PM */

  /* USER CODE END PM */

  /* Private variables ---------------------------------------------------------*/

  /* USER CODE BEGIN PV */

  /* USER CODE END PV */

  /* Private function prototypes -----------------------------------------------*/
  void SystemClock_Config(void);
  /* USER CODE BEGIN PFP */

  /* USER CODE END PFP */

  /* Private user code ---------------------------------------------------------*/
  /* USER CODE BEGIN 0 */

  /* USER CODE END 0 */

  /**
    * @brief  The application entry point.
    * @retval int
    */
  int main(void)
  {
    /* USER CODE BEGIN 1 */

    /* USER CODE END 1 */

    /* MCU Configuration--------------------------------------------------------*/

    /* Reset of all peripherals, Initializes the Flash interface and the Systick. */
    HAL_Init();

    /* USER CODE BEGIN Init */

    /* USER CODE END Init */

   /* Configure the system clock */
   SystemClock_Config();

   /* USER CODE BEGIN SysInit */

   /* USER CODE END SysInit */

   /* Initialize all configured peripherals */
   MX_GPIO_Init();
   MX_I2C1_Init();
   MX_SPI1_Init();
   /* USER CODE BEGIN 2 */
   GB_BMP390_initialize( &BMP390_Module );
   //GB_BMP390_Configuration(&BMP390_Module, FIFO_DISABLE) ;
   GB_BMP390_Configuration(&BMP390_Module, FIFO_ENABLE) ;
   /* USER CODE END 2 */
   /* Infinite loop */
   /* USER CODE BEGIN WHILE */
   while (1)
   {

 		GB_BMP390_Get_Data(&BMP390_Module, FROM_FIFO);
 		//GB_BMP390_Get_Data(&BMP390_Module, FROM_REGISTER);
     /* USER CODE END WHILE */

     /* USER CODE BEGIN 3 */
   }
   /* USER CODE END 3 */
 }

 /**
   * @brief System Clock Configuration
   * @retval None
   */
 void SystemClock_Config(void)
 {
   RCC_OscInitTypeDef RCC_OscInitStruct = {0};
   RCC_ClkInitTypeDef RCC_ClkInitStruct = {0};
   RCC_PeriphCLKInitTypeDef PeriphClkInit = {0};

   /** Initializes the RCC Oscillators according to the specified parameters
   * in the RCC_OscInitTypeDef structure.
   */
   RCC_OscInitStruct.OscillatorType = RCC_OSCILLATORTYPE_HSE;
   RCC_OscInitStruct.HSEState = RCC_HSE_ON;
   RCC_OscInitStruct.HSEPredivValue = RCC_HSE_PREDIV_DIV1;
   RCC_OscInitStruct.HSIState = RCC_HSI_ON;
   RCC_OscInitStruct.PLL.PLLState = RCC_PLL_ON;
   RCC_OscInitStruct.PLL.PLLSource = RCC_PLLSOURCE_HSE;
   RCC_OscInitStruct.PLL.PLLMUL = RCC_PLL_MUL9;
   if (HAL_RCC_OscConfig(&RCC_OscInitStruct) != HAL_OK)
   {
     Error_Handler();
   }

   /** Initializes the CPU, AHB and APB buses clocks
   */
   RCC_ClkInitStruct.ClockType = RCC_CLOCKTYPE_HCLK|RCC_CLOCKTYPE_SYSCLK
                               |RCC_CLOCKTYPE_PCLK1|RCC_CLOCKTYPE_PCLK2;
   RCC_ClkInitStruct.SYSCLKSource = RCC_SYSCLKSOURCE_PLLCLK;
   RCC_ClkInitStruct.AHBCLKDivider = RCC_SYSCLK_DIV1;
   RCC_ClkInitStruct.APB1CLKDivider = RCC_HCLK_DIV2;
   RCC_ClkInitStruct.APB2CLKDivider = RCC_HCLK_DIV1;

   if (HAL_RCC_ClockConfig(&RCC_ClkInitStruct, FLASH_LATENCY_2) != HAL_OK)
   {
     Error_Handler();
   }
   PeriphClkInit.PeriphClockSelection = RCC_PERIPHCLK_I2C1;
   PeriphClkInit.I2c1ClockSelection = RCC_I2C1CLKSOURCE_SYSCLK;
   if (HAL_RCCEx_PeriphCLKConfig(&PeriphClkInit) != HAL_OK)
   {
     Error_Handler();
   }
 }

 /* USER CODE BEGIN 4 */

 /* USER CODE END 4 */

 /**
   * @brief  This function is executed in case of error occurrence.
   * @retval None
   */
 void Error_Handler(void)
 {
   /* USER CODE BEGIN Error_Handler_Debug */
   /* User can add his own implementation to report the HAL error return state */
   __disable_irq();
   while (1)
   {
   }
   /* USER CODE END Error_Handler_Debug */
 }

 #ifdef  USE_FULL_ASSERT
 /**
   * @brief  Reports the name of the source file and the source line number
   *         where the assert_param error has occurred.
   * @param  file: pointer to the source file name
   * @param  line: assert_param error line source number
   * @retval None
   */
 void assert_failed(uint8_t *file, uint32_t line)
 {
   /* USER CODE BEGIN 6 */
   /* User can add his own implementation to report the file name and line number,
      ex: printf("Wrong parameters value: file %s on line %d\r\n", file, line) */
   /* USER CODE END 6 */
 }
 #endif /* USE_FULL_ASSERT */
STLINK V2
STM32CubeMX kullanarak Keil projesini oluşturup kütüphaneyi ekledikten sonra STLINKV2 adaptörünü kullanarak STLINK V2 programlayıcıyı Gebra STM32F303‘e bağlıyoruz.
STLINK V2 programlayıcısını Gebra STM32F303’e bağladığınızda, modüle güç vermeye gerek kalmaz çünkü besleme voltajını doğrudan STLINK V2 programlayıcısından alacak.
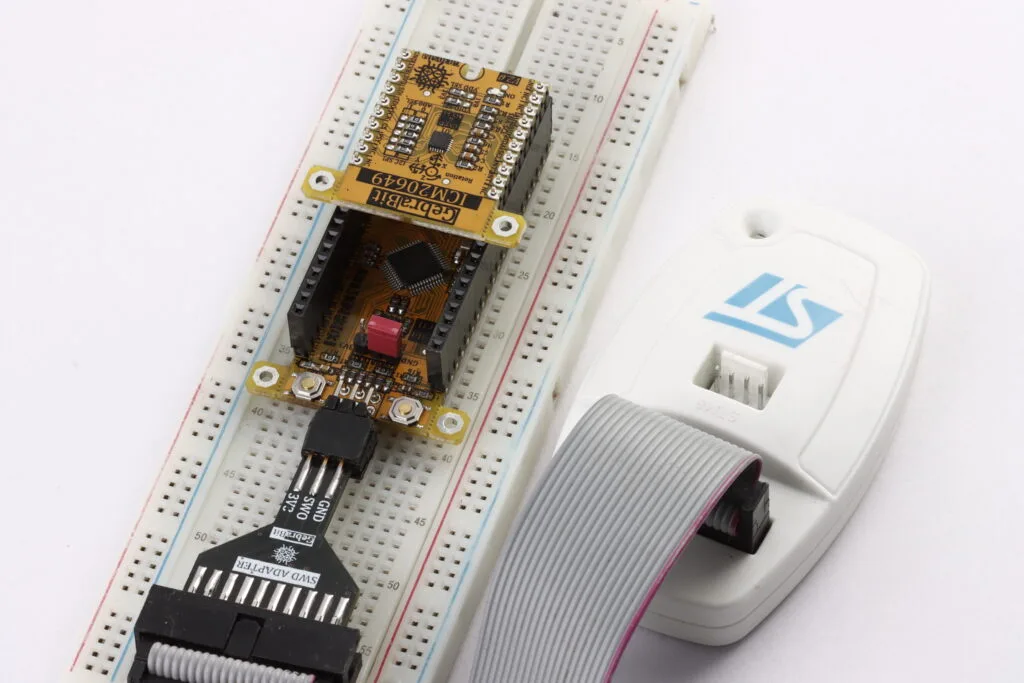
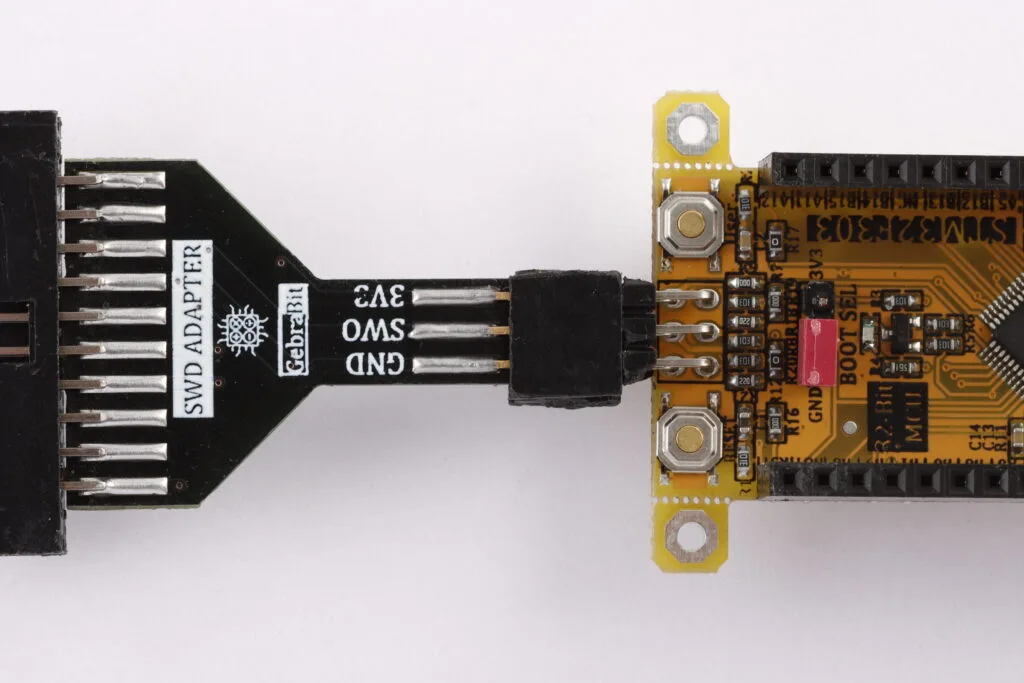
Sonra Build (F7) a tıklayıp Build Output penceresin olası hatalar için kontrol ediyoruz.
Sensör verilerinin doğrudan veri kayıtlarından alınması:

FIFO’dan sensör verilerinin alınması:
